Pages still to be included in other sections
|
My Photography |
|
Thank you Thank you to James McEwan for suggesting that I write these notes. James wrote: |
|
"I'm sure there must be lots of budding amateur snappers who like me, are regular visitors to EdinPhoto and who would be interested in an occasional piece from yourself on: - the camera/lens/settings you employ. - tips you may like to share and editing software used, if any." James McEwan, Duddingston Mills, Edinburgh: February 28, 2011 |
|
I've set out these notes in the style of a talk. e.g. using large text to display 'on screen' as I talk - if I ever deliver these notes as a talk! Please email me if you have any comments of questions. |
|
Choice Themes Documentary Photography Themes 1. Scottish Railway Stations 2. Edinburgh at Work 3. Edinburgh Shops 4. Edinburgh Bus Termini |
|
|
Cameras 1. 1950s 2. 1960s 3. 1990s 4. Today Lenses 1. Long focal lengths 2. Standard focal lengths 3. Short focal lengths 4. Fisheye Other Equipment 1. Tripod 2. Filters Darkrooms and Computers |
|
|
C. |
Techniques Exposure Time Depth of Field Viewpoint |
|
D. |
Film or Digital? Cost + Convenience Results |
|
E. |
Alternative Processes A Few Examples 1. Infra-red 2. Pinhole 3. Stereo Views 4. Bromoil |
|
F. |
Software Photoshop 1. RAW or JPG images 2. Levels 3. Shadows+ Highlights 4. Panoramas |
|
Return to Index |
C
Techniques
|
Return to Index |
D
Film or Digital
|
Return to Index |
E
Alternative Processes
|
Return to Index |
F
Software
|
Return to Index |
Include some of the details below from the talk I gave to Midlothian Camera Club
|
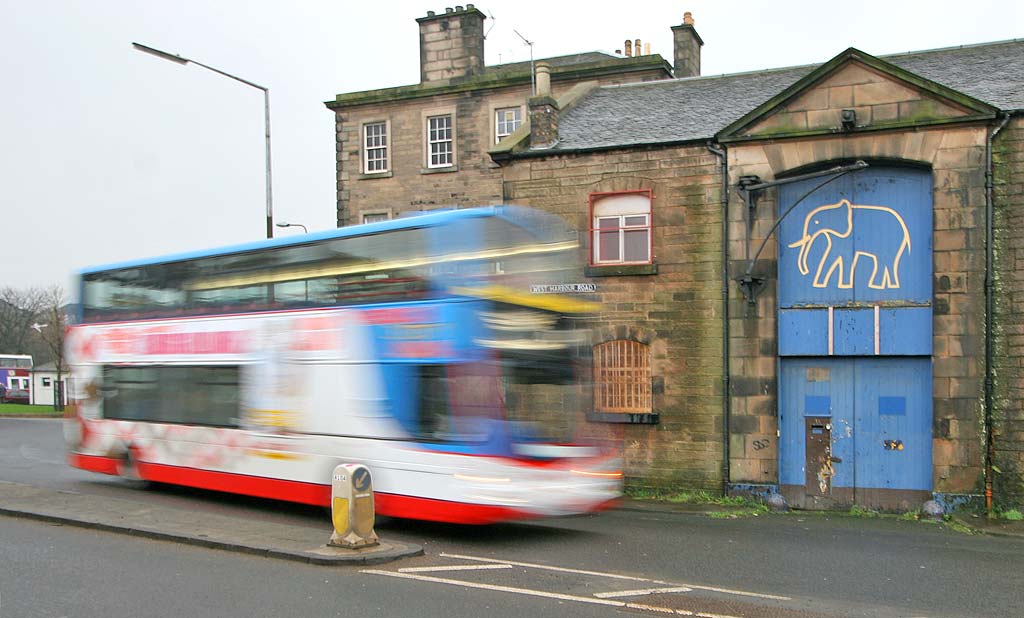
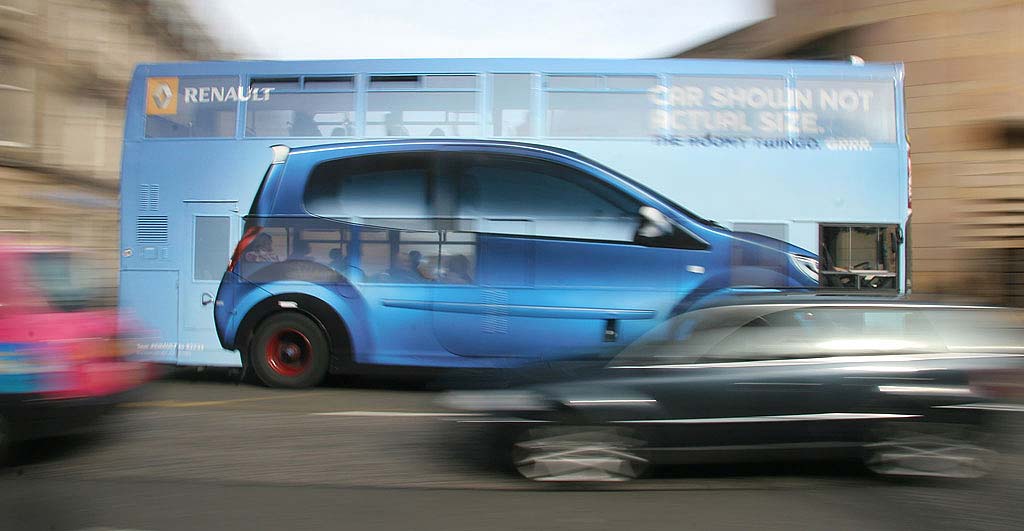
Camera held still for 1/8 second f6.7
© Copyright: For permission to reproduce, please contact peter.stubbs@edinphoto.org.uk Camera panned for 1/6 second f22
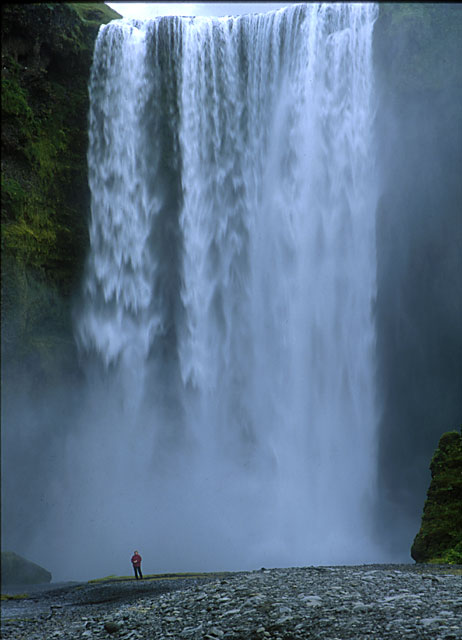
© Copyright: For permission to reproduce, please contact peter.stubbs@edinphoto.org.uk Waterfalls, fountains, and other moving water:
- Short shutter speeds capture all the
droplets and spray, sharply. e.g. 1/1000 sec
- Long shutter speeds turn the water
'milky' e.g. 1/30 to several seconds
© peter.stubbs@edinphoto.org.uk - Photograph taken July 2001
|
|
5 |
|
6. |
||
|
Aperture |
||
|
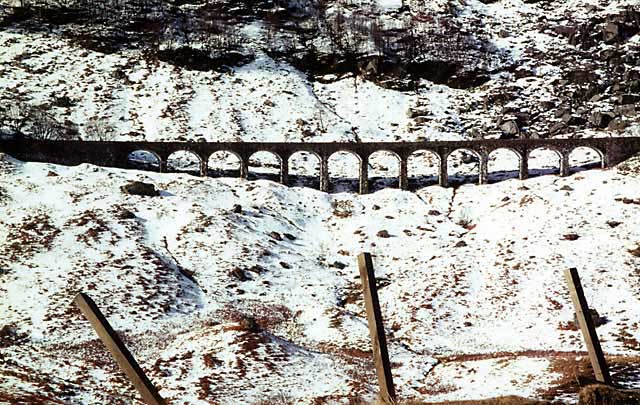
Depth of Field A small aperture, like f16, keeps most or all of a photo in focus. Here are two views of Glen Ogle with the fence posts and the viaduct both in focus.
© Copyright: Peter Stubbs - please contact peter.stubbs@edinphoto.org.uk
© Copyright: Peter Stubbs - please contact peter.stubbs@edinphoto.org.uk
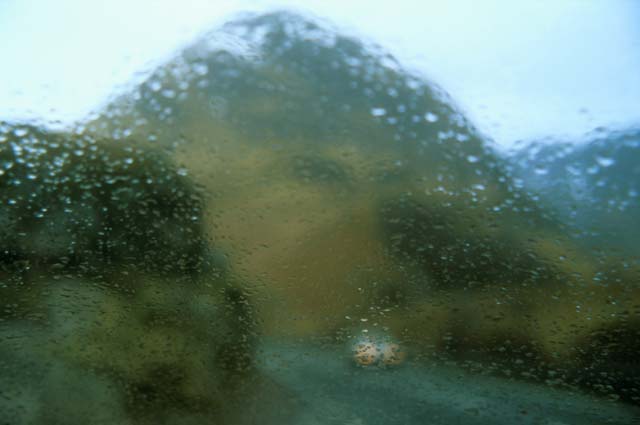
A large large aperture, like f2.8, has a shallower depth of field, so keeps only the chosen area in focus. Here are three views on the road to Glencoe, with more selective focus. f2.8 - focus on the windscreen
© Copyright: Peter Stubbs - please contact peter.stubbs@edinphoto.org.uk
|
||
|
Relationship between Aperture and Shutter Speed SMALLER 'f' number (e.g. f2) = LARGER aperture = MORE LIGHT so needs SHORTER exposure All these give the same result: Examples: f2 1/1000 sec f2.8 1/500 sec f4 1/250 sec f5.6 1/125 sec f8 1/60 sec f11 1/30 sec f16 1/15 sec f22 1/8 sec
|
||
|
Why is the in-between value f5.6, not f6? - f8 is a measure of the diameter of the hole in the lens that lets in the light. - f4 is double the diameter of f8, so lets in 4x as much light as f8. - f5.6 is 1.414 ( = root 2 ) x the diameter of f8, so lets in 2x as much light as f8. Explanation: f2 2 x 2 = 4 f2.8 2.8 x 2.8 = 8 f4 4 x 4 = 16 f5.6 5.65 x 5.65 = 32 f8 8 x 8 = 64 f11 11.3 x 11.3 = 128 f16 16 x 16 = 256 f22 22.6 x 22.6 = 512 The intermediate values above have been rounded. e.g. 16 x 1.414 = 22.624, but this is described as f22. |
||
|
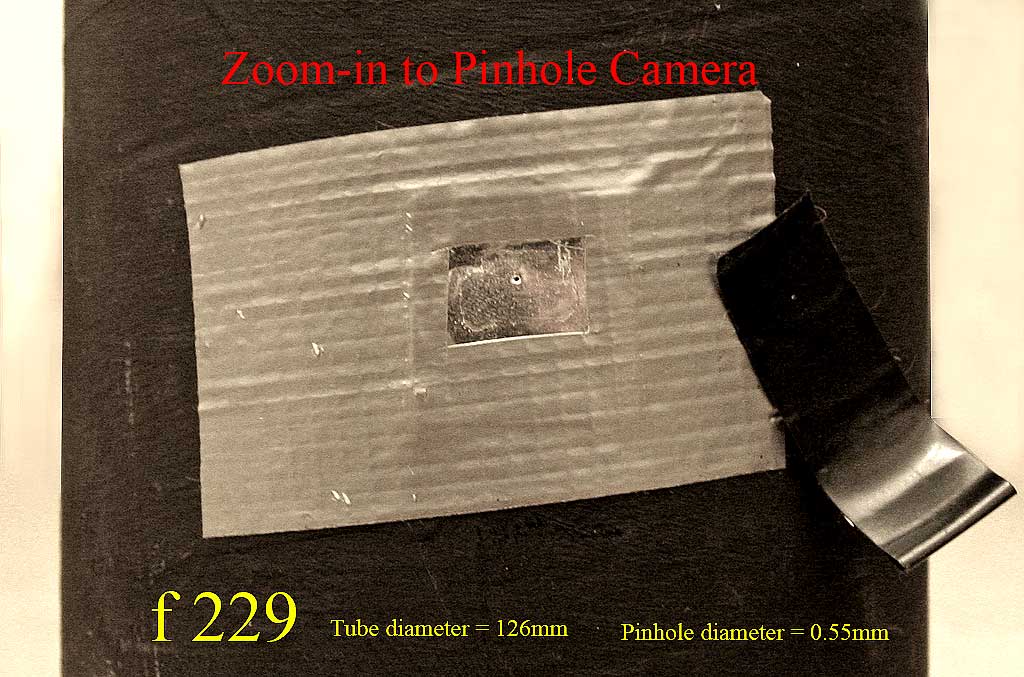
Zoom-in to look at the Pinhole
© Copyright: For permission to reproduce, please contact peter.stubbs@edinphoto.org.uk
|
||
|
6
|


|
7. |
||||||
|
Can you Trust the Camera? |
||||||
|
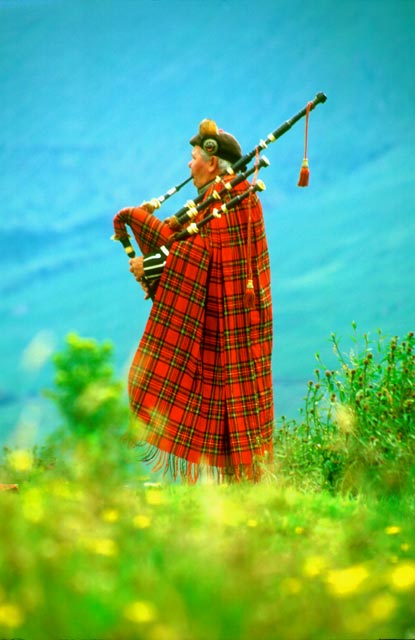
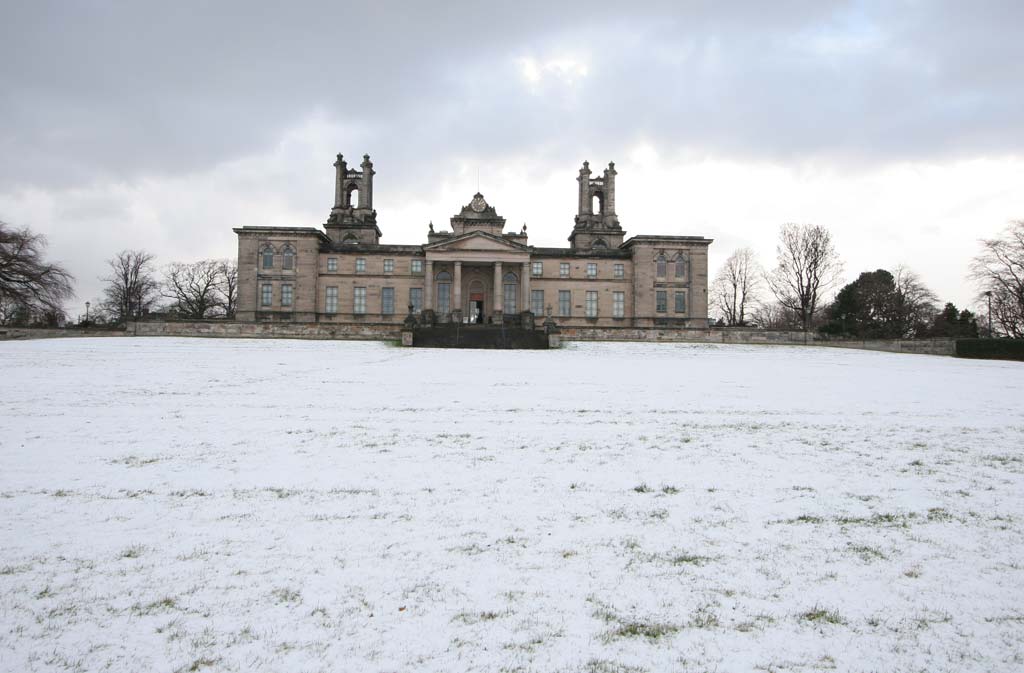
Often, YES ... BUT not always. 1. The camera assumes that a picture tone is mid-grey - Mid-grey is often a reasonable assumption - BUT LIGHT SUBJECTS - A snow scene or wedding dress at mid-grey looks wrong - Try 1 or 2 stops more exposure to make it look LIGHTER - 1 stop more = twice as much exposure. e.g at f8: 1/500 sec instead of 1/1000 sec. Photo 1: What the camera saw: 1/500*, f5.6
© Copyright: For permission to reproduce, please contact peter.stubbs@edinphoto.org.uk Photo 2: What the camera saw + 1 stop: 1/250, f5.6
© Copyright: For permission to reproduce, please contact peter.stubbs@edinphoto.org.uk Photo 3: What the camera saw + 2 stops: 1/125, f5.6
© Copyright: For permission to reproduce, please contact peter.stubbs@edinphoto.org.uk
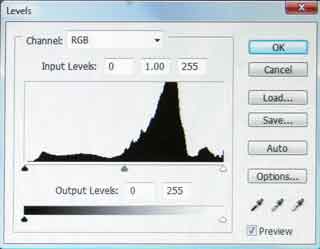
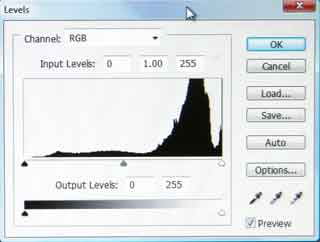
DARK SUBJECTS - Dark subjects can also confuse the camera A photo in a coal cellar, or a shop front painted black, should not be grey. - Try 1 or 2 stops less exposure to make it look DARKER. 2. Can the camera cope with the range of brightness? - Squint at a scene to see the possible outcome. - Expose for the highlights. Don't lose detail in lightest parts. - Consider a graduated neutral density filter for the sky - On bright days, use 'fill in flash' outdoors - For portraits, consider using a reflector - If in doubt, bracket e.g at f8: 1/1000, 1/500, 1/250 sec. - Then use the best OR - combine more than one (possibly with HDR software) 3. Look at the levels chart on the back of the camera - Try exposure compensation and see how the chart changes. NOTE: Despite all the comments above, I find that it can be a good idea to ALSO take a photo at the exposure recommended by the camera. This may, in fact, turn out to be the best exposure, and with digital cameras there's no additional cost involved in taking an extra exposure. |
||||||
|
7 |
||||||


|
8. |
|
How to Set the Camera |
|
Full Auto Av - Aperture priority Tv - Shutter Priority Manual |
|
Full Auto - Usually reliable. - If the occasion is important and may difficult to 'go back and do it again e.g. a wedding, it may be a good idea to take a range of photos in 'full auto' mode, no matter what other photos are being taken. |
|
Aperture Priority
- Useful to keep control over the depth of
field.
- Maybe keep foreground and background in
focus on a landscape.
- Maybe isolate one person in a crowd, as
for some press photos. - Check on the shutter speed required. Be prepared to use a tripod.
- Historic rule was don't hand-hold for >
1/focal length
- Now with image stabiliser lens it is
possible to hand-hold for longer - Despite the above rule, it is surprising how much a tripod can help.
|
|
Shutter Priority - Useful where you want to use a particular time and depth of field is less critical. - for waterfalls or flowing water - for fast action in sport - for panning subjects
|
|
Manual - This can prevent the camera from doing what it wants to do, if you think it's going to get things wrong. e.g. - For copying photos, find the exposure using a 'grey card' then keep to that exposure for all photos, providing the lighting conditions do not change. This should give a true copy of the photos, rather than one where the lighter and darker pictures have been adjusted by the camera. - For panoramas, choose a day with no wide variations of light across the panorama. Find the exposure needed for an average part or important part of the scene. Set the camera to manual on that exposure for all settings. - For scenes that are fairly monochrome in a dark of light colour, e.g. snow or dark or light building, use a grey card, lit and angled in the same way as the subject, then use manual - OR for digital photography (with no extra film or processing to pay for) it may be easier to just bracket the photo and select the best later.
|
|
8 |
|
9. |
|
A Few Photos |
|
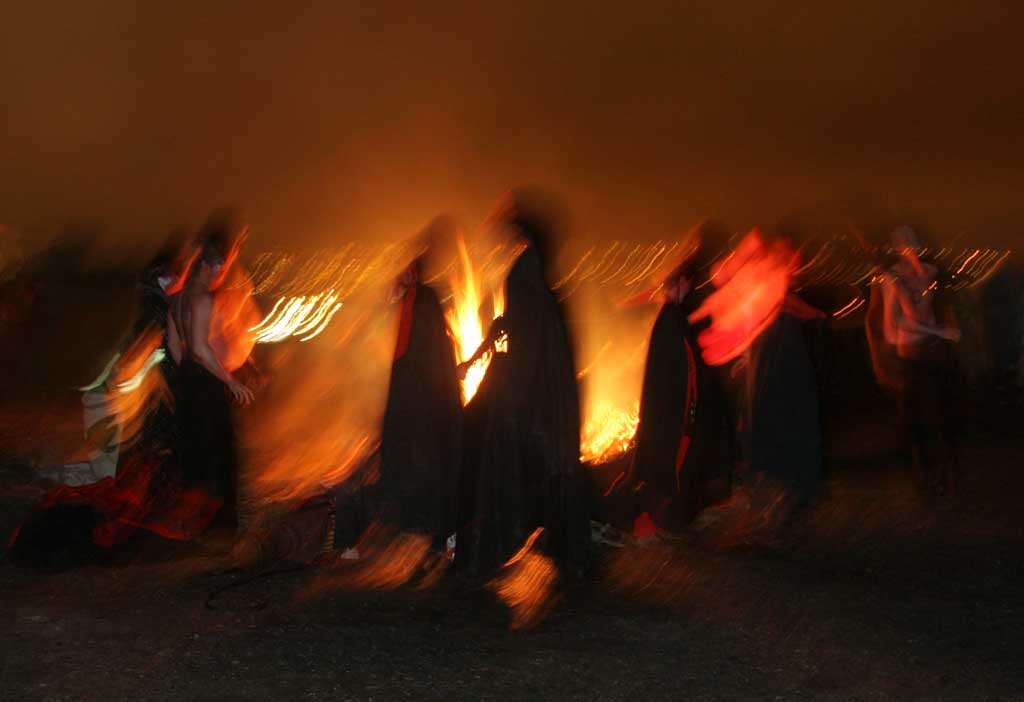
(a) Direct and Reflected Light (i) Flash lights the subject DIRECTLY - A brighter flash is needed if the subject is further away - Move 2x as far away: the flash has to be 4x as bright. - Move 3x as far away: the flash has to be 9x as bright. - Automatic flash can cope with this (within limits) - Automatic flash at an outdoor event at night is only likely to illuminate the head of the person in front, not the performers on stage in the distance. (bad) - Fill in flash, used for an outdoor portrait in bright light at daytime will fill in the dark shadows in the face, but will leave the background unchanged. (good) Beltane Festival - Movement from the camera and the dancers
© peter.stubbs@edinphoto.org.uk Photograph taken: May 1, 2008 at 1am 400 ISO but a lot of noise in the background Beltane Festival - Flash on aperture priority freezes the action in the foreground
© peter.stubbs@edinphoto.org.uk Photograph taken: April 30, 2006; 10.21pm (ii) Sun and Floodlighting lights the subject INDIRECTLY - Distance to the subject in a landscape does not affect the brightness. - Brightness depends on the colour and texture of different parts of the scene and whether they are in the sun or the shade. - Exposure for the moon is same as is needed for a fine day on earth. - Move further from a floodlit building and it still needs the same exposure. - So you can move closer to take exposure reading, then move back for photo.
|
|
(b) Dusk and Dawn - Colour in the sky may last for only a few minutes - Photograph before the sky gets too dark / light
© Copyright: Peter Stubbs - please contact peter.stubbs@edinphoto.org.uk This photograph has been used on a CD cover.
© Copyright: Peter Stubbs - please contact peter.stubbs@edinphoto.org.uk Photo taken: August 14, 1994
|
|
(c) Mixed Lighting Tungsten + fluorescent + daylight: - a challenge! © Peter Stubbs. Please contact peter.stubbs@edinphoto.org.uk Photograph taken February 12, 1992
More on the same theme Convert to Sepia and keep some colour © Please contact peter.stubbs@edinphoto.org.uk Photograph taken February 18, 1993
|
|
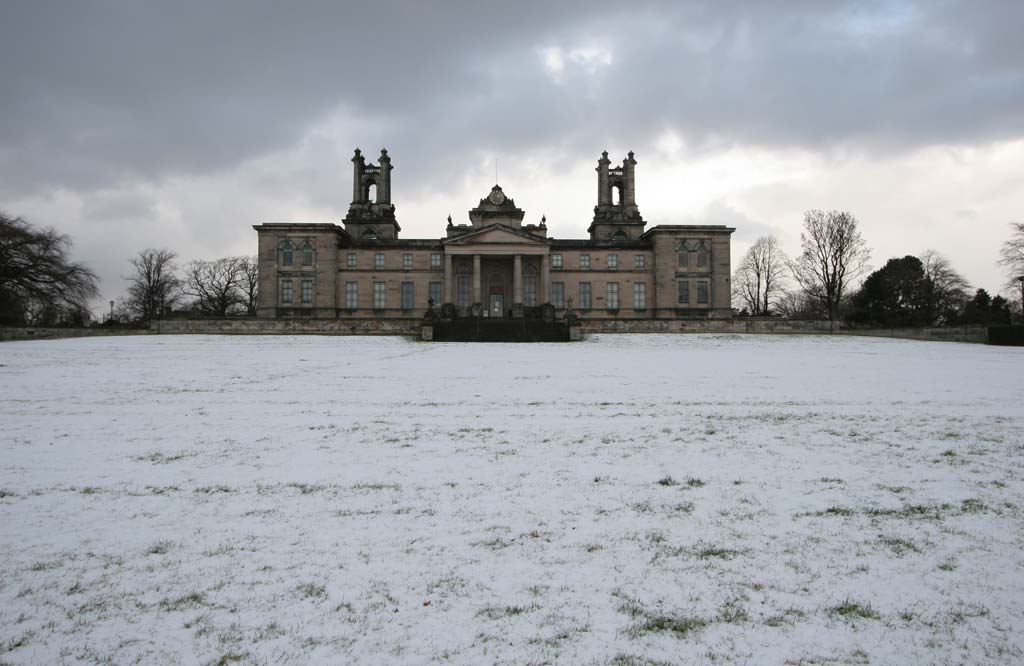
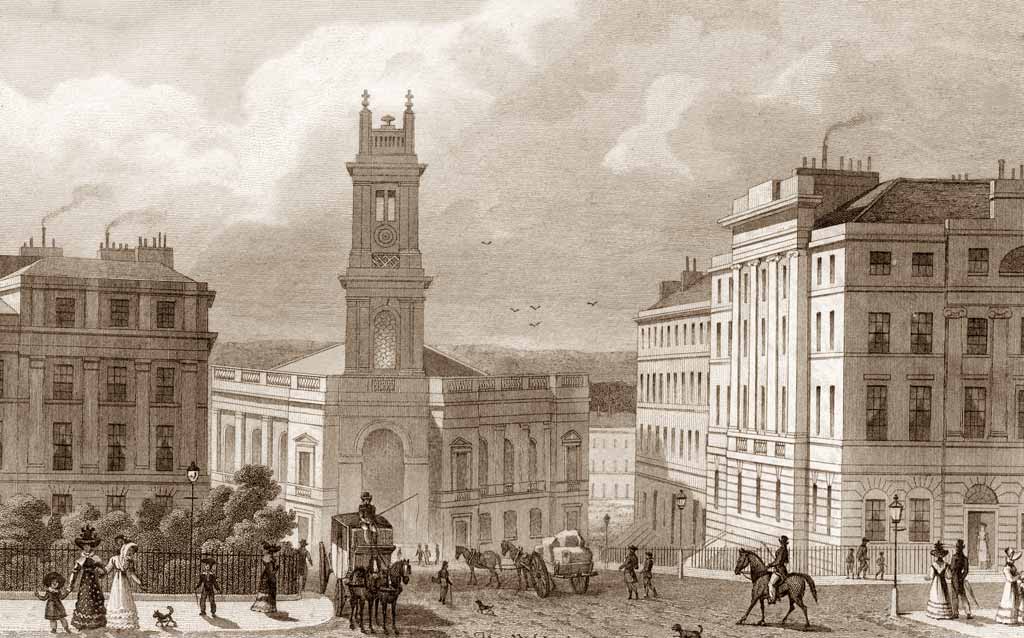
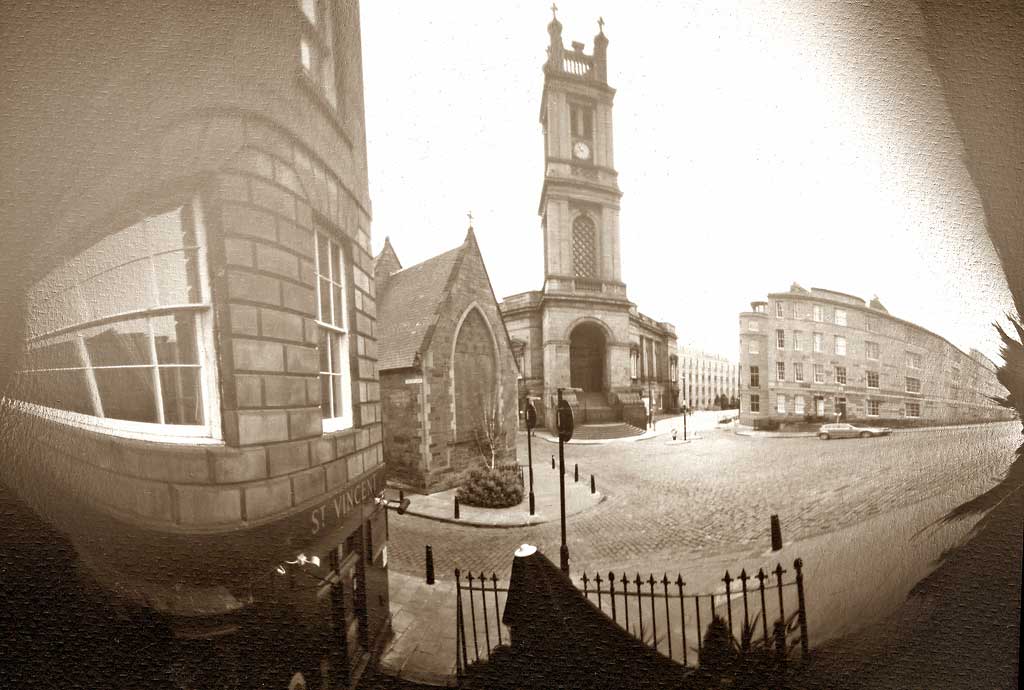
(d) Pinhole Photography St Stephen's Church Near Edinburgh Photographic Society Old engraving - Published 1829
© Copyright: For permission to reproduce, please contact peter.stubbs@edinphoto.org.uk Photo taken with the pinhole camera Weather bright: Exposure 25 minutes
© Copyright: Peter Stubbs - please contact peter.stubbs@edinphoto.org.uk Photograph taken 10.40am on April 29, 2007 Distortions The distortions in this photo are not because the photo was taken with a pinhole camera. They are due to the cylindrical shape of the photographic paper when it is in the camera. |
|
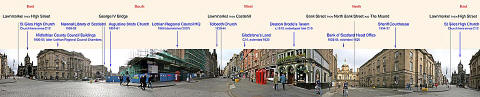
(e) Panoramas
© Copyright: For permission to reproduce, please contact peter.stubbs@edinphoto.org.uk
© Copyright: Peter Stubbs - peter.stubbs@edinphoto.org.uk Photograph taken on August 24, 2006
|
|
9 |

designed to hold 16 in x 12 in sheets of photographic paper, not film.
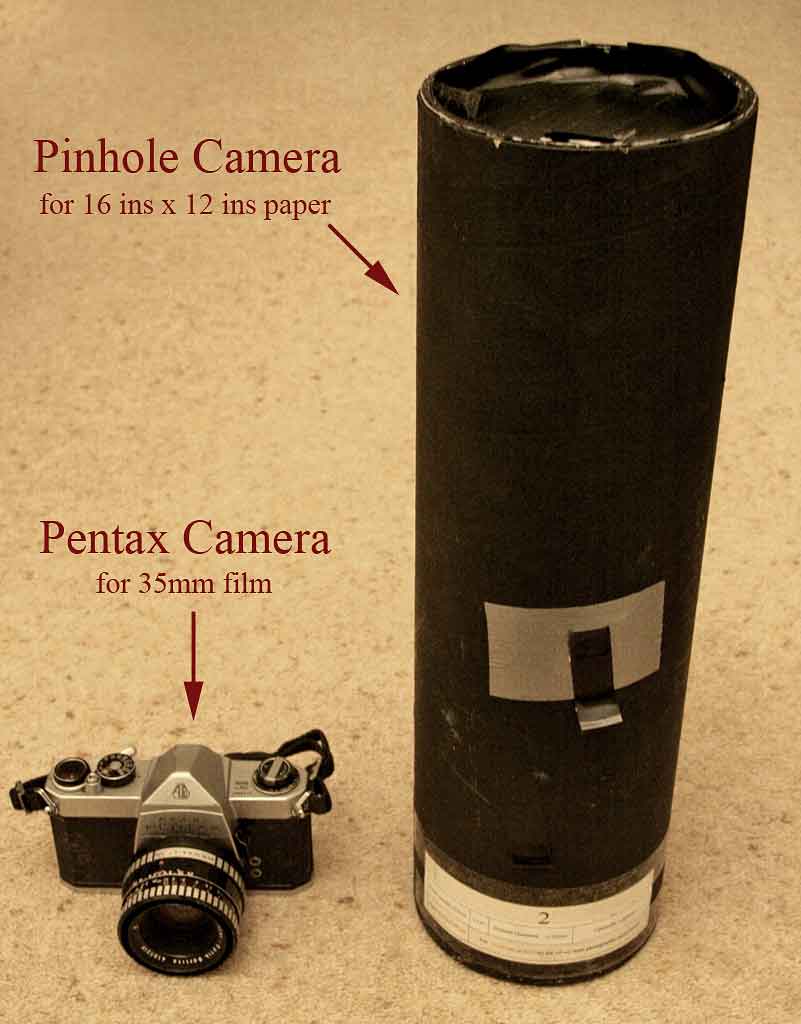
© Copyright: For permission to reproduce, please contact peter.stubbs@edinphoto.org.uk
|
10. |
B
Equipment
|
Cameras |
|
Canon For about the past five years I've been using a Canon Digital SLR camera. - first an EOS 20D, now an EOS 7D - I chose Canon because I had previously been using a Canon EOS film camera, and the lenses were compatible with the digital camera. - If I had previously been using a Nikon camera for film, I would probably have moved to a Nikon Digital SLR camera. - If I had been previously using any other make of camera for film, I might have considered changing to Canon or Nikon, because of the wide range and the quality of equipment from these manufacturers. |
|
SLR Cameras Many people will prefer compact cameras because of their convenience. That's fine! They may often produce results that match those of an SLR, though many may not be able to produce high quality exhibition prints or fine prints in difficult lighting conditions. I get satisfaction from the greater control provided by an SLR camera. See the section on Techniques (C. below). I find the delay before a photo is taken, after pressing the shutter before the |
|
All Cameras I find that the success of a photo may well depend more on recognising good lighting and composition, and taking advantage of these, than on the camera used. - though in difficult lighting conditions, a good camera and lens, and using a tripod can help a lot. In difficult lighting conditions, a good camera and lens, and using a tripod can help to achieve high quality results. However, I find that the success of a photo may well depend more on taking advantage of good lighting and opportunities that arise, rather than on the equipment used. |
|
Lenses Some zoom-lenses cover a wide range of focal lengths. If a lens from a 35 mm film camera is used on a digital camera with a smaller sensor, its focal length increases. e.g. my 50mm lens, when used on my EOS 7D camera becomes an 80mm lens. |
|
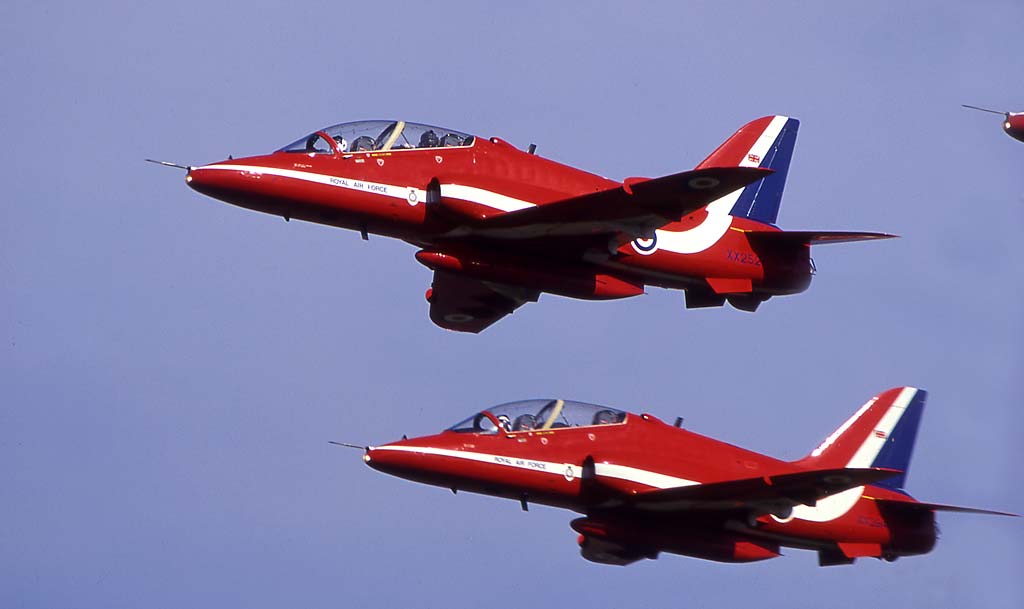
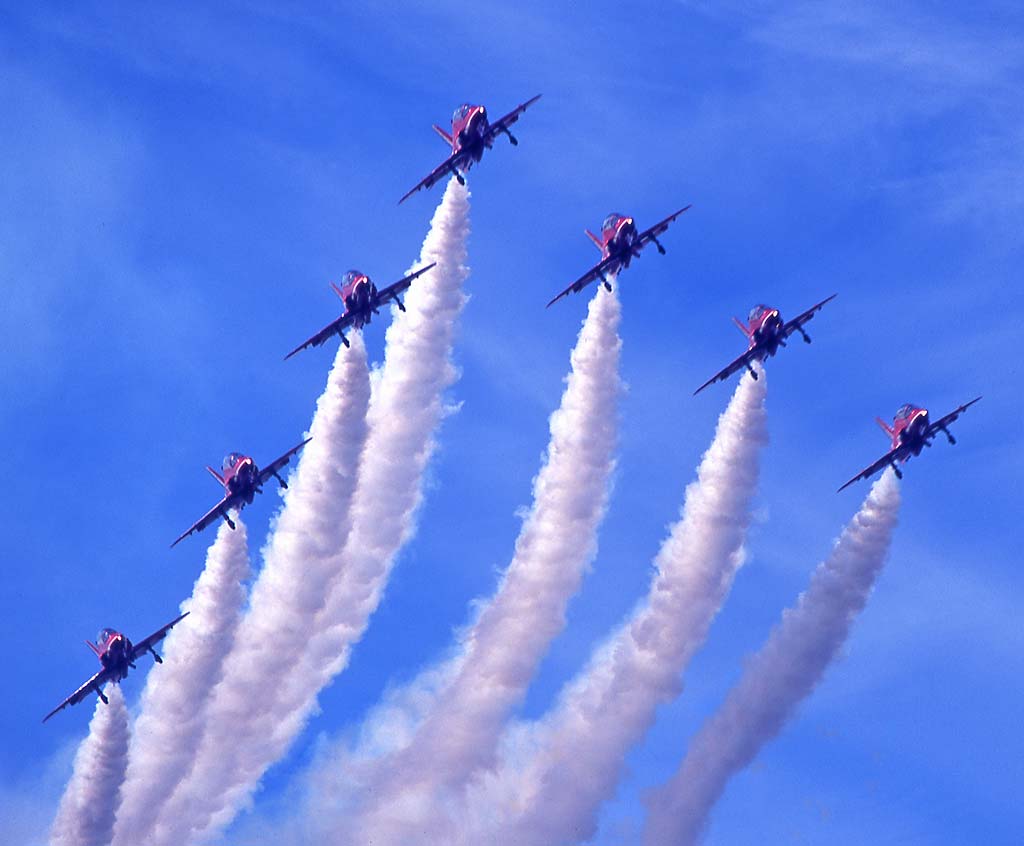
Long Focal Lengths Telephoto: eg. 200mm, 300mm, 500mm * These lenses come into their own for wildlife photography, sports photography and other photography where it is not practical to move in close to the subject. It will often be necessary to use a tripod to avoid 'camera shake'. Here are some photos with at long focal lengths: Camera panned for 1/125 sec f5.6 210mm
© Copyright: Peter Stubbs - please contact peter.stubbs@edinphoto.org.uk Photograph taken September 22, 1990 Camera still 1/250 sec f4 210mm
© Copyright: Peter Stubbs - please contact peter.stubbs@edinphoto.org.uk Photograph taken September 22, 1990
|
|
Standard Focal Length e.g. 35mm, 50mm, 80mm A standard lens can be a good compromise for photographing people. The camera can be brought fairly close to the subject, but not so close as to distort the features, as can happen with a wide angle lens. Here are some photos taken at standard focal lengths |
|
Short Focal Length Wide Angle: e.g. 10mm, 15mm, 24mm I often prefer to use wide focal lengths. I feel that these help to show the environment surrounding the subject better, and help to put the subject in context. Including items close to the camera in the foreground can help create a sense of depth to a photo. Here are some photos taken at wide focal lengths
|
|
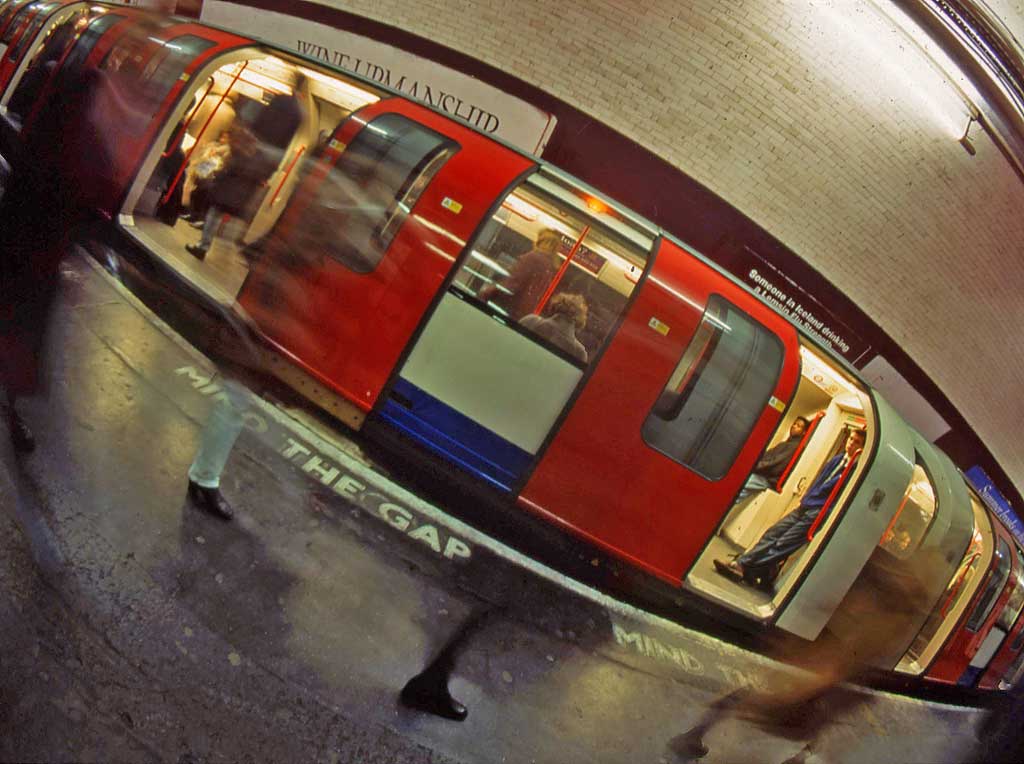
Fisheye A Fisheye lens is an extreme example of a wide angle lens. It gives a field of view of 180 degrees across the diagonal of the photo. When using a fisheye lens, I have to be careful not to include my shoes in the foreground! The image created by a fisheye lens is distorted - all straight lines in the image, except any that pass through the centre of the picture, become curves. This can make a photo more creative, or can destroy the image, according to taste. Here are some photos taken using a fisheye lens. The photograph of the underground train was taken with a long exposure. That's what created the 'one-legged commuters'. Wide angle lenses and particularly fisheye lenses give a large depth of field. i.e. everything is in focus even when a large aperture such as f3.5 is used. © Peter Stubbs - please contact peter.stubbs@edinphoto.org.uk Photograph taken January 12, 1995
|
|
Other Equipment |
|
Tripod It is not always convenient to use a tripod (e.g. in crowded, busy situations) but where it is convenient to use one (e.g. for landscape photos) it can often improve the photo. Camera shake is avoided, and the photographer can spend more time thinking about and fine-tuning the composition of a photo. These photos were taken with a tripod. |
|
Filters The only filter that I normally use (apart from a skylight to protect the lens) is a polarising filter. On days with blue sky and white clouds, a polarising filter can create a more dramatic sky. It can also bring our the colours in a rainbow more clearly and can reduce reflections, e.g. in shop windows and in water. Here are some photos taken with a polarising filter. |
|
Return to Index |
C
Techniques
|
Return to Index |
D
Film or Digital
|
Return to Index |
E
Alternative Processes
|
Return to Index |
F
Software
|
Return to Index |
Include some of the details below from the talk I gave to Midlothian Camera Club
|
Camera held still for 1/8 second f6.7
© Copyright: For permission to reproduce, please contact peter.stubbs@edinphoto.org.uk Camera panned for 1/6 second f22
© Copyright: For permission to reproduce, please contact peter.stubbs@edinphoto.org.uk Waterfalls, fountains, and other moving water:
- Short shutter speeds capture all the
droplets and spray, sharply. e.g. 1/1000 sec
- Long shutter speeds turn the water
'milky' e.g. 1/30 to several seconds
© peter.stubbs@edinphoto.org.uk - Photograph taken July 2001
|
|
5 |
|
6. |
||
|
Aperture |
||
|
Depth of Field A small aperture, like f16, keeps most or all of a photo in focus. Here are two views of Glen Ogle with the fence posts and the viaduct both in focus.
© Copyright: Peter Stubbs - please contact peter.stubbs@edinphoto.org.uk
© Copyright: Peter Stubbs - please contact peter.stubbs@edinphoto.org.uk
A large large aperture, like f2.8, has a shallower depth of field, so keeps only the chosen area in focus. Here are three views on the road to Glencoe, with more selective focus. f2.8 - focus on the windscreen
© Copyright: Peter Stubbs - please contact peter.stubbs@edinphoto.org.uk
|
||
|
Relationship between Aperture and Shutter Speed SMALLER 'f' number (e.g. f2) = LARGER aperture = MORE LIGHT so needs SHORTER exposure All these give the same result: Examples: f2 1/1000 sec f2.8 1/500 sec f4 1/250 sec f5.6 1/125 sec f8 1/60 sec f11 1/30 sec f16 1/15 sec f22 1/8 sec
|
||
|
Why is the in-between value f5.6, not f6? - f8 is a measure of the diameter of the hole in the lens that lets in the light. - f4 is double the diameter of f8, so lets in 4x as much light as f8. - f5.6 is 1.414 ( = root 2 ) x the diameter of f8, so lets in 2x as much light as f8. Explanation: f2 2 x 2 = 4 f2.8 2.8 x 2.8 = 8 f4 4 x 4 = 16 f5.6 5.65 x 5.65 = 32 f8 8 x 8 = 64 f11 11.3 x 11.3 = 128 f16 16 x 16 = 256 f22 22.6 x 22.6 = 512 The intermediate values above have been rounded. e.g. 16 x 1.414 = 22.624, but this is described as f22. |
||
|
Zoom-in to look at the Pinhole
© Copyright: For permission to reproduce, please contact peter.stubbs@edinphoto.org.uk
|
||
|
6
|
|
7. |
||||||
|
Can you Trust the Camera? |
||||||
|
Often, YES ... BUT not always. 1. The camera assumes that a picture tone is mid-grey - Mid-grey is often a reasonable assumption - BUT LIGHT SUBJECTS - A snow scene or wedding dress at mid-grey looks wrong - Try 1 or 2 stops more exposure to make it look LIGHTER - 1 stop more = twice as much exposure. e.g at f8: 1/500 sec instead of 1/1000 sec. Photo 1: What the camera saw: 1/500*, f5.6
© Copyright: For permission to reproduce, please contact peter.stubbs@edinphoto.org.uk Photo 2: What the camera saw + 1 stop: 1/250, f5.6
© Copyright: For permission to reproduce, please contact peter.stubbs@edinphoto.org.uk Photo 3: What the camera saw + 2 stops: 1/125, f5.6
© Copyright: For permission to reproduce, please contact peter.stubbs@edinphoto.org.uk
DARK SUBJECTS - Dark subjects can also confuse the camera A photo in a coal cellar, or a shop front painted black, should not be grey. - Try 1 or 2 stops less exposure to make it look DARKER. 2. Can the camera cope with the range of brightness? - Squint at a scene to see the possible outcome. - Expose for the highlights. Don't lose detail in lightest parts. - Consider a graduated neutral density filter for the sky - On bright days, use 'fill in flash' outdoors - For portraits, consider using a reflector - If in doubt, bracket e.g at f8: 1/1000, 1/500, 1/250 sec. - Then use the best OR - combine more than one (possibly with HDR software) 3. Look at the levels chart on the back of the camera - Try exposure compensation and see how the chart changes. NOTE: Despite all the comments above, I find that it can be a good idea to ALSO take a photo at the exposure recommended by the camera. This may, in fact, turn out to be the best exposure, and with digital cameras there's no additional cost involved in taking an extra exposure. |
||||||
|
7 |
||||||
|
8. |
|
How to Set the Camera |
|
Full Auto Av - Aperture priority Tv - Shutter Priority Manual |
|
Full Auto - Usually reliable. - If the occasion is important and may difficult to 'go back and do it again e.g. a wedding, it may be a good idea to take a range of photos in 'full auto' mode, no matter what other photos are being taken. |
|
Aperture Priority
- Useful to keep control over the depth of
field.
- Maybe keep foreground and background in
focus on a landscape.
- Maybe isolate one person in a crowd, as
for some press photos. - Check on the shutter speed required. Be prepared to use a tripod.
- Historic rule was don't hand-hold for >
1/focal length
- Now with image stabiliser lens it is
possible to hand-hold for longer - Despite the above rule, it is surprising how much a tripod can help.
|
|
Shutter Priority - Useful where you want to use a particular time and depth of field is less critical. - for waterfalls or flowing water - for fast action in sport - for panning subjects
|
|
Manual - This can prevent the camera from doing what it wants to do, if you think it's going to get things wrong. e.g. - For copying photos, find the exposure using a 'grey card' then keep to that exposure for all photos, providing the lighting conditions do not change. This should give a true copy of the photos, rather than one where the lighter and darker pictures have been adjusted by the camera. - For panoramas, choose a day with no wide variations of light across the panorama. Find the exposure needed for an average part or important part of the scene. Set the camera to manual on that exposure for all settings. - For scenes that are fairly monochrome in a dark of light colour, e.g. snow or dark or light building, use a grey card, lit and angled in the same way as the subject, then use manual - OR for digital photography (with no extra film or processing to pay for) it may be easier to just bracket the photo and select the best later.
|
|
8 |
|
9. |
|
A Few Photos |
|
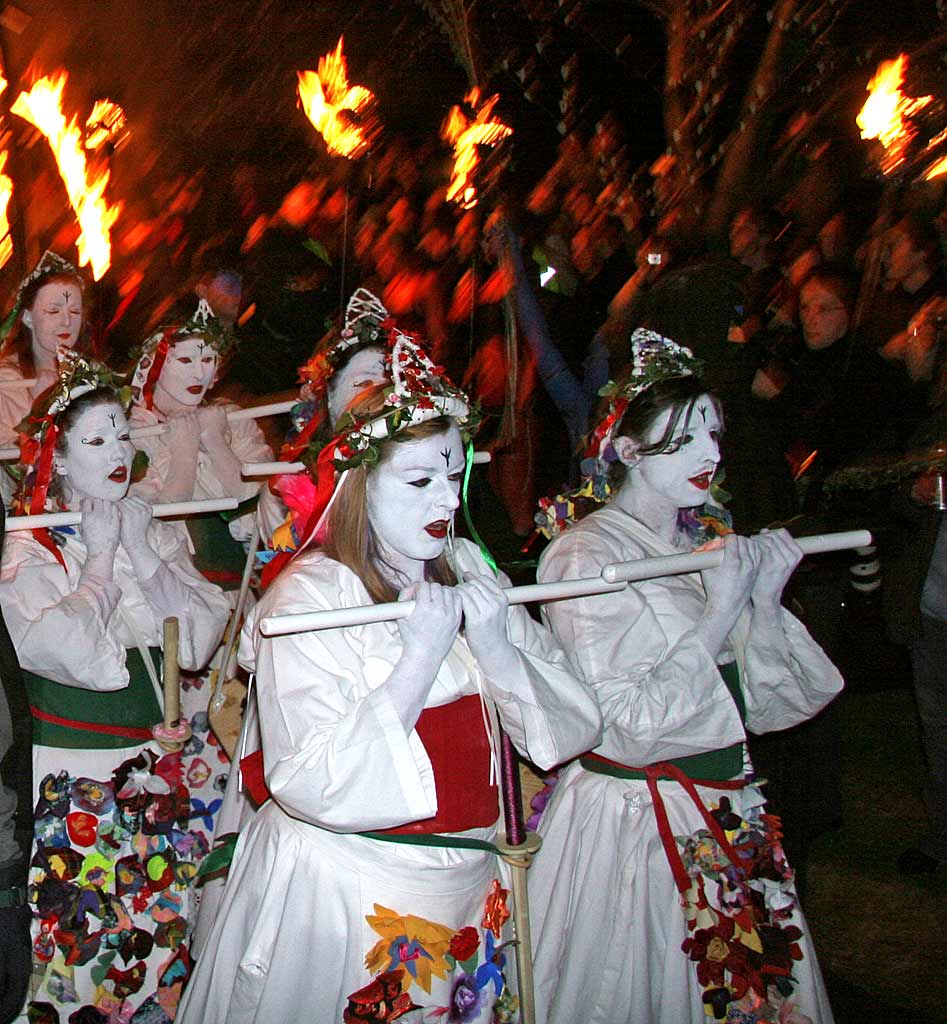
(a) Direct and Reflected Light (i) Flash lights the subject DIRECTLY - A brighter flash is needed if the subject is further away - Move 2x as far away: the flash has to be 4x as bright. - Move 3x as far away: the flash has to be 9x as bright. - Automatic flash can cope with this (within limits) - Automatic flash at an outdoor event at night is only likely to illuminate the head of the person in front, not the performers on stage in the distance. (bad) - Fill in flash, used for an outdoor portrait in bright light at daytime will fill in the dark shadows in the face, but will leave the background unchanged. (good) Beltane Festival - Movement from the camera and the dancers
© peter.stubbs@edinphoto.org.uk Photograph taken: May 1, 2008 at 1am 400 ISO but a lot of noise in the background Beltane Festival - Flash on aperture priority freezes the action in the foreground
© peter.stubbs@edinphoto.org.uk Photograph taken: April 30, 2006; 10.21pm (ii) Sun and Floodlighting lights the subject INDIRECTLY - Distance to the subject in a landscape does not affect the brightness. - Brightness depends on the colour and texture of different parts of the scene and whether they are in the sun or the shade. - Exposure for the moon is same as is needed for a fine day on earth. - Move further from a floodlit building and it still needs the same exposure. - So you can move closer to take exposure reading, then move back for photo.
|
|
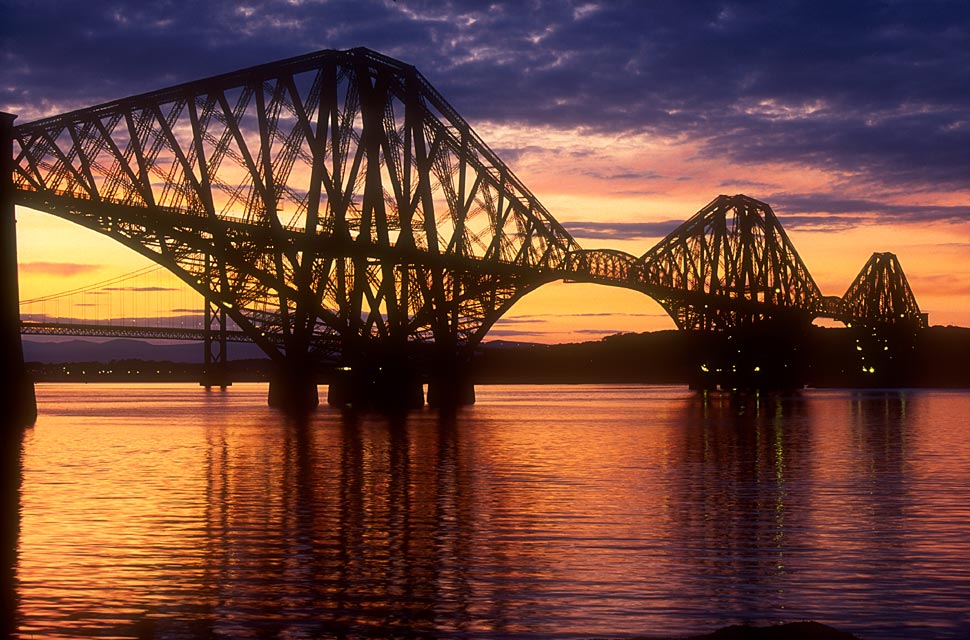
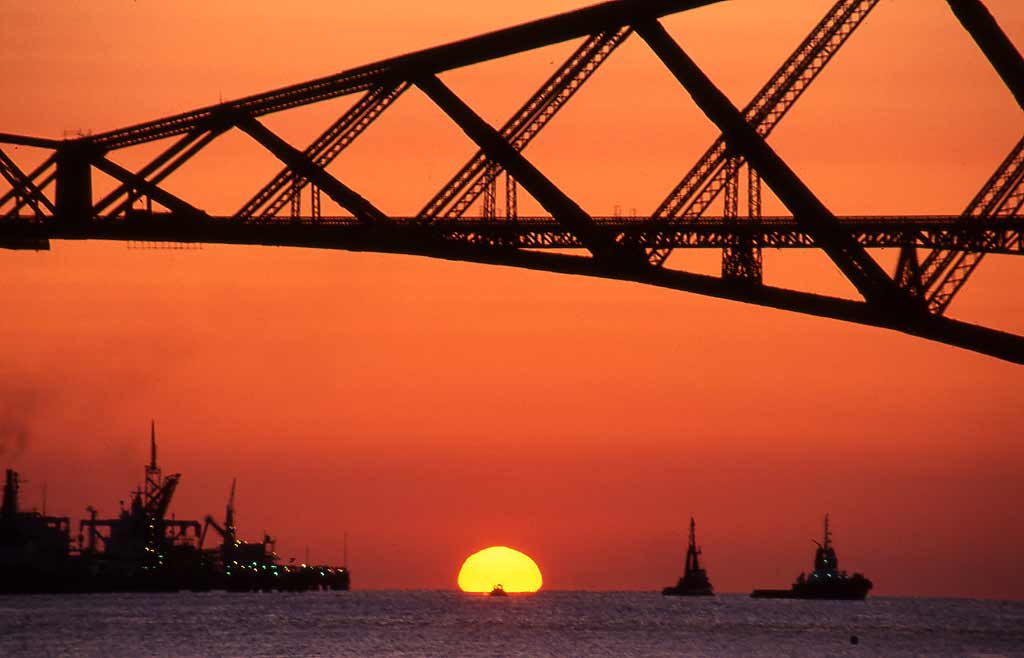
(b) Dusk and Dawn - Colour in the sky may last for only a few minutes - Photograph before the sky gets too dark / light
© Copyright: Peter Stubbs - please contact peter.stubbs@edinphoto.org.uk This photograph has been used on a CD cover.
© Copyright: Peter Stubbs - please contact peter.stubbs@edinphoto.org.uk Photo taken: August 14, 1994
|
|
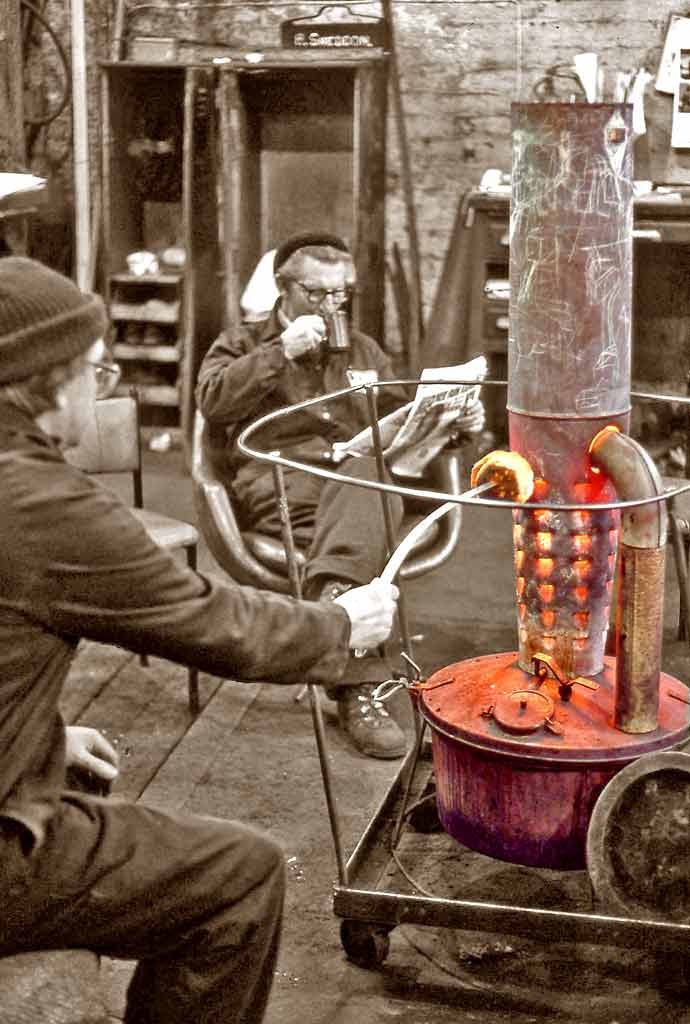
(c) Mixed Lighting Tungsten + fluorescent + daylight: - a challenge! © Peter Stubbs. Please contact peter.stubbs@edinphoto.org.uk Photograph taken February 12, 1992
More on the same theme Convert to Sepia and keep some colour © Please contact peter.stubbs@edinphoto.org.uk Photograph taken February 18, 1993
|
|
(d) Pinhole Photography St Stephen's Church Near Edinburgh Photographic Society Old engraving - Published 1829
© Copyright: For permission to reproduce, please contact peter.stubbs@edinphoto.org.uk Photo taken with the pinhole camera Weather bright: Exposure 25 minutes
© Copyright: Peter Stubbs - please contact peter.stubbs@edinphoto.org.uk Photograph taken 10.40am on April 29, 2007 Distortions The distortions in this photo are not because the photo was taken with a pinhole camera. They are due to the cylindrical shape of the photographic paper when it is in the camera. |
|
(e) Panoramas
© Copyright: For permission to reproduce, please contact peter.stubbs@edinphoto.org.uk
© Copyright: Peter Stubbs - peter.stubbs@edinphoto.org.uk Photograph taken on August 24, 2006
|
|
9 |
designed to hold 16 in x 12 in sheets of photographic paper, not film.
© Copyright: For permission to reproduce, please contact peter.stubbs@edinphoto.org.uk
|
Index
Please scroll down this page,
|
|
|
Cameras 1. Scottish Railway Stations 2. Edinburgh at Work 3. Edinburgh Shops Lenses 1. Long focal lengths 2. Standard focal lengths 3. Short focal lengths 4. Fisheye Other Equipment 1. Tripod 2. Filters |
|
|
Note: |
Sections C, D, E, F below have still to be written. |
|
C. |
Techniques Exposure Time Depth of Field Viewpoint |
|
D. |
Film or Digital? Cost + Convenience Results |
|
E. |
Alternative Processes A Few Examples 1. Infra-red 2. Pinhole 3. Stereo Views 4. Bromoil |
|
F. |
Software Photoshop 1. RAW or JPG images 2. Levels 3. Shadows+ Highlights 4. Panoramas |
|
Summary |
|
Scope for Photography We all have our favourite subjects for photography I enjoy documentary photography Documentary Photography Themes Here are a few of my themes: 2. Edinburgh at Work 3. Edinburgh Shops 4. Edinburgh Bus Termini |
|
10. |