|
Links to Other Pages
|
| ||||||||||||||||||||
|
|
|
|
Early Photographic Processes Daguerreotype 1839-1850s |
||
|
Discovery |
Daguerre Daguerre was a scene painter at the Paris Diorama. He experimented with capturing a permanent image from the mid 1830s onwards. Initially he had difficulty in persuading others of the commercial merits of his process. However, an announcement of his daguerreotype process was made on 7 January 1839. This was an image on a silver-plated highly-polished plate. The image emerged when the plate was immersing the plate in mercury vapour. Early experiments with the Daguerreotype process took much longer to produce the image, using only the light of the sun. Was the use of mercury vapour to speed up this process perhaps discovered accidentally? The About Photography web site gives brief details about Daguerre and his Daguerreotype process. |
|
|
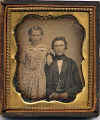
Professional Photographers The Daguerreotype process required special equipment and expertise. It tended not to be used by amateur photographers. The French Government gave the Daguerreotype process free of charge to the whole world, except for England where a licence had to be bought. In the 1840s, Daguerreotype was the main process used in France and the USA. At one time in the 1840s, there were 2,000 Daguerreotype photographers in the USA. [David Burder] Daguerreotypes were expensive. In the 1840s, it was only the wealthier classes of society who had their portraits taken. |
||
|
Process |
Steps, as described by Daguerre The Daguerreotype process resulted in an image being created on the surface of a highly polished silver plate, or silver-coated brass or copper plate. The process used highly dangerous hot mercury vapour to develop the plate. This led to a high mortality rate amongst the early practitioners. The Daguerreotype process below are as described by Daguerre in his pamphlet, The Daguerreotype, and in later pamphlets The process consists of five steps: 1. Clean and polish the plate. 2. Expose to iodine fumes to create silver iodide. 3. Expose the plate in the camera 4. Bring out the picture. This is done by Exposing the plate to mercury vapour in a Mercury Box to bring out the image. This causes a layer of mercury vapour to be deposited on the areas of the metal plate that have been exposed to light. 5. Fix the image. |
|
|
Other Steps 2a. Fume with Bromine. This step became normal practice from the mid-1840s onwards. It increased the sensitivity of the plate by about a factor of 10. 6. Gild the image This step is optional 7. Colour the image This step is optional 8. Seal with glass 9. Enclose in a case. This step is optional |
||
|
From Mid-1840s NOTE: If the book from which the instructions above are taken had been written a couple of years later, there may well have been a further step between 2. and 3. above. i.e. |
||
|
1. Clean and Polish the Plate - Take a well-prepared plate without blemishes - Fix the plate by cement to a smaller wooden block - Hold the wooden block in the left hand, and dust lamp-black over the plate. - Rub over the surface of the plate with a velvet buff. |
||
|
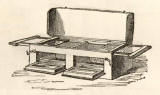
2. Coat the Plate - Take a box made of glass or porcelain, with a well-fitting glass lid. - Pour a solution of iodine into the box. - Attach the plate to the underside of the lid and put the lid on the box. - Allow the plate to be coated with iodine until it turns a golden yellow colour. Inspect with a candle [Too short and it will remain pail and not be sensitive. Too long and it will turn violet and cannot be used.] |
||
|
3. Expose the Plate - Place the plate in the camera taking care to protect from light. - Expose the plate. 10 to 60 seconds exposure is usually required. |
||
|
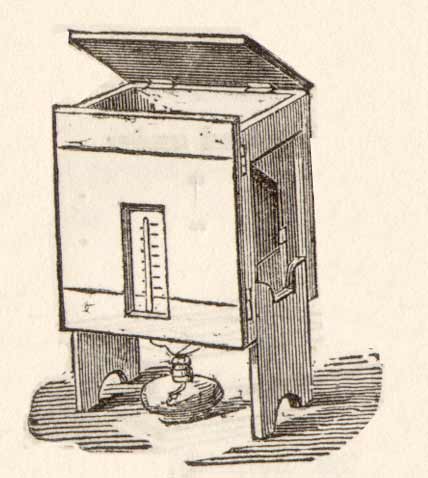
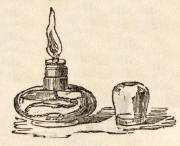
4. Bring out the Picture - Support the plate at an angle of 45% in the upper portion of a box. Mercury Box This box is coated hard black varnish on the inside. The upper portion of the box has a lid and glass front to allow inspection. The glass is covered by a sliding door or curtain to keep out the light. The lower portion of this box has a small porcelain or sheet metal cup to hold mercury, and a thermometer to measure the temperature of the mercury. The box is supported on legs above a spirit lamp. - Light the spirit lamp to apply heat to the cup containing the mercury. Heat to 140 degrees F (never more than 170) then remove the lamp. - Observe the picture through the glass, and when the temperature has fallen to 113 degrees F, remove the plate from the box. |
||
|
5. Fix the Image - Support the plate at an angle of 45% in a flat porcelain dish. - Pour cold distilled water over the plate. - Wash with a weak solution of hypo-sulphite of soda. - Tone the Plate (if desired) by placing the plate on a brass stand THEN covering with a solution of chloride of gold THEN applying heat with a spirit lamp THEN pouring off any surplus liquid. - Wash with warm water. - The plate is now ready to be mounted, to be preserved from dust and damp. |
||
|
6. Gild the image - Gilding is optional, but if performed it brings up the intensity of the image and makes it more robust. Gold chloride is poured over a plate, heated over a Bunsen burner. |
||
|
7. Colour the image - Hand colouring is optional. It is a very delicate process. Daguerreotype images tended to be fairly small. The image layer is extremely thin and can easily be damaged, so colour might be added to it using a brush with a single hair. |
||
|
8. Seal with Glass - Protection the plate with glass over the picture is essential as the image on the surface is extremely thin and can be damaged, even by a light touch. |
||
|
9. Enclose in a Case - Daguerreotypes were expensive 'one-off' pictures, so the additional cost of a nice case to hold and protect the picture would probably be considered appropriate. |
||
|
Source: Photogenic Manipulation, published in 1843 |
||
|
Chemicals for the Daguerreotype Process Below is a list of chemicals for the Daguerreotype process, taken from the catalogue of Bland & Long published in 1856. Please click on the list below for further details.
|
||
|
Result |
A daguerreotype photograph is a faint negative image, but with good detail, on the copper plate, as a result of its very thin image on the metal surface. The appearance changes with the angle of viewing and can look positive from some angles, and can barely be seen at all from other angles. A good positive image can be seen when light from a black surface is reflected onto the image. The image is reversed, left to right, so clothing appears to be buttoned wrong way round. Daguerreotypes were normally mounted behind glass in small hinged cases with velvet lining. |
|
|
The image was very delicate and could be easily damaged - even by brushing against it. The image was often toned in gold to create a more durable image. |
||
|
The Daguerreotype process was patented in England and Wales. I originally thought that the Daguerreotype process had not been patented in Scotland, but I must now thank Prof. John Hannavy for clarifying the situation. John wrote:
James Howie held a daguerreotype exhibition in 1839. Several of Edinburgh's professional photographers established daguerreotype businesses in Princes Street in the 1840s. These included: George Popowitz and John Thomson who worked in partnership with calotypist James Ross. |
||
|
Today |
||
|
Becquerel Daguerreotype There are still a few people still working with the Daguerreotype process, including the chemist and stereoscopy worker, David Burder, who was featured on TV in 2003 when he created the largest Daguerreotype in the world, 48 ins x 24 ins. He gave a demonstration of the Becquerel Daguerreotype process to APIS (Alternative Processing International Symposium) 2004. The Becquerel Daguerreotype process is named after Becquerel who discovered it in the 1840s. It is similar to the original Daguerreotype process practiced in the 1840s, except that the plates are developed by exposing them to light through rubylith or amberlith, available from repro houses, rather than by exposure to the hazardous fumes of hot mercury. The Becquerel process produces good images, but not so fine as those produced using either hot mercury or cold mercury in a vacuum. [David Burder] develop the plates in the dangerous fumes of hot mercury, they are developed by being exposed to light through rubylith or amberlith, available from repro houses. For the APIS demonstration, a silver coated copper plate that had been fumed in iodine the previous day was polished with rouge (=rust powder). |
||
|
Links to Other Pages
|
|
Early Photography - More pages |
|
All Pages Processes Types of Photograph Prices charged Sizes |
|
Links to Other Pages
|
Let the cursor hover over any of the buttons above and it will display further details.
LINKS: All underlined words and pictures on this site are links. Please click on any of them..
|
Links to Other Pages
|
Let the cursor hover over any of the buttons above and it will display further details.
LINKS: All underlined words and pictures on this site are links. Please click on any of them..
| ||||||||||||||||||||