|
Links to Other Pages
|
| ||||||||||||||||||||
|
|
|
|
Early Photographic Processes Albumen Prints 1855 - 1895 |
|
|
Discovery |
Glass Plates In 1847, Abel Niépce de Saint-Victor coated glass plates with the whites of eggs (albumen) mixed with potassium iodide. He then made them sensitive to light by immersing them in a bath of silver nitrate. In 1850, Blanquart-Evrard improved the process, making the plates more sensitive to light. |
|
Paper Blanquart-Evrard also coated paper in the same way, so enabling collodion negatives to be used to produce albumen prints. [PCH] During the 1850s both albumen and collodion prints were made, but from around 1860 onwards, albumen prints became the norm, until gelatin paper became available in the 1890s. |
|
|
Process |
Albumen printing paper was produced commercially. The albumen was mixed with chlorine, bromine or iodine salts before being immersed in silver nitrate. However, here are the instructions given by Blanquart-Evrard for creating a negative on albumenised paper: |
|
Coat the paper with albumen as follows: 1. Beat into a froth the whites of eggs, to which a saturated solution of iodide of potassium has been added in the proportion of 30 drops for each egg. 2. Let the mixture stand until the froth returns to a liquid state. 3. Filter through clean muslin, and collect the albumin in a large flat vessel. 4. On this lay a paper to be prepared, and allow it to remain there for some minutes. 5. When it has imbibed the albumen, lift it up by one of its corners and let it drain. 6. Dry it by suspending it with pins to a line or cord across the room. |
|
|
Render the paper sensitive as follows: 7. Cover a piece of glass with aceto-nitrate of silver, composed of one part nitrate of silver, two parts of glacial acetic acid, and ten of distilled water. 8. On this solution, the albumen paper should be carefully laid. 9. Beginning at one corner of the paper, it should be depressed on the solution by an even regular motion, not stopping a moment, otherwise there will be a stain. 10. After the paper has become quite transparent, which may be ascertained by lifting it up, and looking through it at a candle, it must be dried between folds of blotting paper, and placed between the glasses of a camera frame then exposed. |
|
|
Expose, Develop and Fix the negative: 11. Take the photograph with the paper in the camera. 12. Develop the paper using a saturated solution of gallic acid. 13. As soon as sufficiently developed, wash off the gallo-nitrate, changing the washing water twice. 14. Leave the paper in the water for 10 minutes, then press between the folds of clean blotting paper. 15. Place in a strong solution of hyposulphite of soda to fix the image, then take out as soon as the yellow iodide of silver has been dissolved. 16. Wash well in abundance of common water, and leave in the water for several hours. 17. Dry between blotting paper. |
|
|
The instruction from M Blanquart Evrard above are taken from the book Photogenic Manipulation by RJ Bingham, published 1852. |
|
|
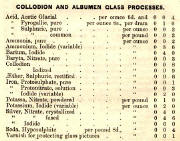
Chemicals for the Albumen Glass Processes Below is a list of chemicals for the Albumen glass processes, taken from the catalogue of Bland & Long published in 1856. Please click on the list below for further details.
|
|
|
Result |
Albumen prints have a slightly glossy surface. They are sepia colour, some having a fine range of tones in gold or brown. Albumen prints retained detail well, and did not show the texture of the paper, as had been the case with the earlier salted paper prints from the calotype process. Albumen prints tended to fade and turn yellowish when exposed to light - unless they have been gold-toned, in which case they remain an attractive purple shade. |
|
In Edinburgh |
This site includes albumen prints of Edinburgh, by several photographers, including James Valentine and GW Wilson |
|
More Details |
There are a many pages on the internet that give fuller details of the albumen process, including this one from the alternative photography web site, which explains how to make paper for albumen prints. |
|
Links to Other Pages
|
|
Early Photography - More pages |
|
All Pages Processes Types of Photograph Prices charged Sizes |
|
Links to Other Pages
|
Let the cursor hover over any of the buttons above and it will display further details.
LINKS: All underlined words and pictures on this site are links. Please click on any of them..
|
Links to Other Pages
|
Let the cursor hover over any of the buttons above and it will display further details.
LINKS: All underlined words and pictures on this site are links. Please click on any of them..
| ||||||||||||||||||||